imAIgic Reviews:AI Image Prompts Database for Midjourney and Stable Diffusion
About imAIgic
imAIgic is a comprehensive platform that provides over 1000 high quality prompts for creators, entrepreneurs, and prompt engineers.
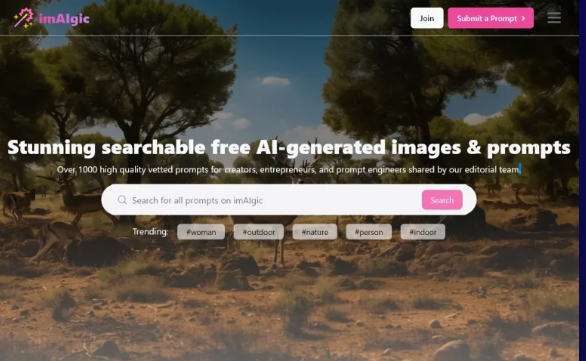
imAIgic provides a searchable library of high-quality prompts and images created with tools Midjourney and Stable Diffusion. It offers over 1000 vetted prompts curated by an editorial team to help creators, entrepreneurs, and artists generate and find stunning visual art. You can perform a manual search or browse through categories like popular images, curated collections,models used, and more.
How to create animated GIFs with Midjourney AI art
There are two distinct approaches to creating animated GIFs using Midjourney art. Users can either decide to use the feature provided by Midjourney to convert still images to GIFs or employ external applications and techniques to convert images generated by Midjourney into GIFs.
Since the AI model can generate multiple variations of the image, it makes it easier for users to create unique GIFs with the images generated. Let’s look at the first approach.
- Using the –video parameter and converting MP4 to GIF
In addition to generating images from textural prompts, Midjourney allows users to create a short video of the image that shows the evolution of the image creation process. The video shows a short time-lapse video of when the AI tool starts processing the image from the prompt to when the image is completed.
Midjourney uses the –video parameter, which is typically added at the end of the prompt, to change how the image is generated. However, the –video parameter can only be used to create GIFs of the initial image grid that contains all 4 images that are generated based on the prompt. It does not work when upscaling the images since there is no transformation to show at this point.
Additionally, the –video parameter can be used when making variations, zooming out, or panning on images as long as the image grid is there. Here’s a step-by-step guide on how to convert Midjourney images to GIFs using the –video parameter.
- Step 1: Access the Midjourney server
Start by accessing any of Midjourney’s servers on Discord. You can also access the Midjourney Bot from your own Discord server or Discord DM.
- Step 2: Create your prompt

Once you have accessed the Midjourney server, tap on the text box at the bottom of the page and type /image to create your prompt. Type in a detailed description of the image you want to create and end the text with the –video parameter.
- Step 3: Send request
Once your prompt is complete, click “Enter” to send the image generation request to the AI tool. Midjourney will automatically start processing the image. Upon completion, the program will present you with its response, a grid of four images matching your description.
- Step 4: Add reaction
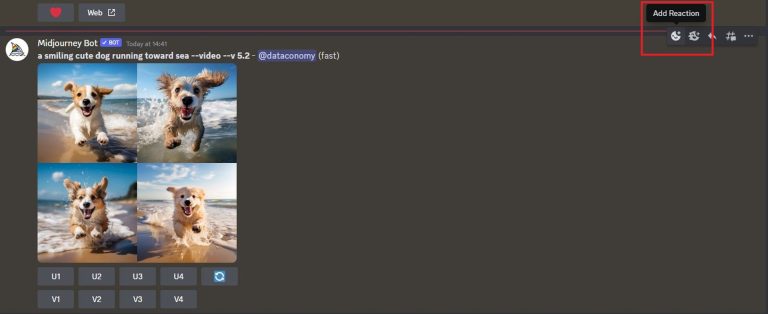
Move your cursor over the response and click on the “Add Reaction” button, which is represented by a smiley face icon with a plus sign that appears on the right side of Midjourney’s response.
Type in “envelope” on the search bar that appears when the reaction menu opens and click on the first envelope emoji in the search results.
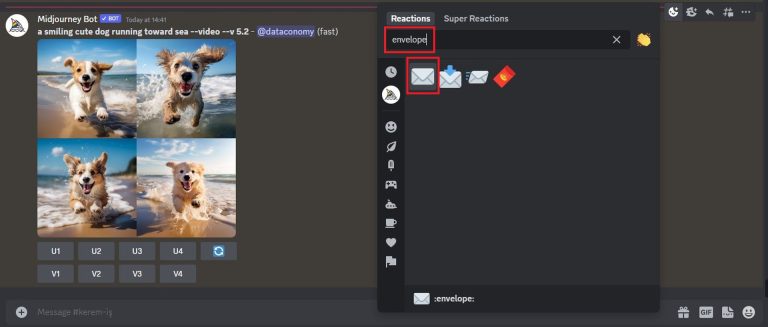
- Step 5: View and download GIF
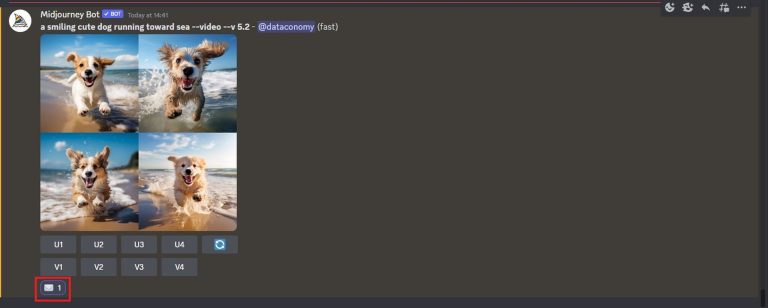
The envelope then appears under the initial response and Midjourney will immediately send you another response. This time with more details about your created GIF, including a link to the short video.
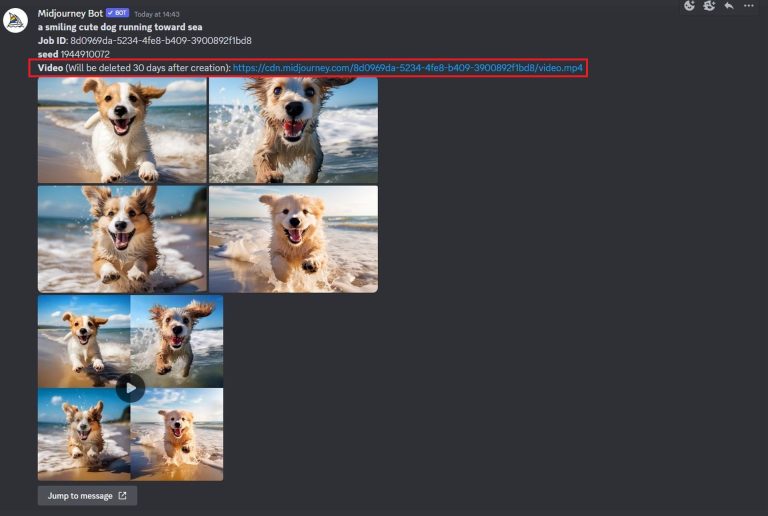
Clicking on the link will take you to a new page on your web browser where you can play the newly generated GIF. You can then Right-click or Long-Press to download the GIF.

- Using other services
You can also decide to turn your Midjourney images into cool animated GIFs using other online photo and video editing tools like Photoshop, Canva, and Giphy. The process involved is quite simple and easy to follow.
The main trick to getting sharp GIFs from your generated images is to upscale the image multiple times. Since Midjourney’s image generation AI is based on the diffusion model, upscaling the image diffuses the initial image and creates a higher-resolution version of the same image.
Once you generate your images on Midjourney, upscale the images as many times as possible and download them. Then take the following steps to convert your images to GIFs using Adobe Photoshop.
- Step 1: Upload the images
Start by importing all of your selected images as layers in the Photoshop file, with each frame of your animation in separate layers.
- Step 2: Select the timeline
Once your image layers are open, go to Window > Timeline and click on the “Create Frame Animation” button.
- Step 3: Convert layers into animation frames
Click on the menu icon in the upper right corner of the Timeline panel and select “Make Frames From Layers.” This will allow you to separate all the layers into individual frames in your animation.
Preview the animation by clicking the “Play” button on the Timeline. Alternatively, you can press the spacebar on your keyboard.
- Step 4: Set GIF to loop
Set the animated GIF to loop by clicking the “Repeat” menu and select how long each frame is on the screen. However, it is often best to select “Forever”, which creates a continuous loop. Preview the animation again to confirm.
- Step 5: Export and save
Once you are satisfied with the outcome, go to File > Export > Save for Web (Legacy) to export the GIF. Select the designated folder for your GIF and enjoy!
Quick tips for building animated GIFs
Here are a few tips to keep in mind when creating animated GIFs:
- Label the layers
Don’t forget to label the layers of your images. This tip is especially important when creating animated GIFs using Photoshop. Labeling allows you to be more organized, reducing the time spent on creating the animations.
- Limit the number of colors
Resist the urge to add more colors to your GIFs. Not only does using fewer colors make the GIF more appealing, but it also reduces the file size. Choose colors that are captivating and blend well together.
- Use fewer frames
The beauty of GIFs is in their simplicity. To achieve the maximum impact, reduce the number of frames in the animation. You don’t have to use the entire image set generated by Midjourney to create one GIF. However, make sure not to reduce the frames so much that the animation becomes choppy.
- Start simple
It is easy to get overwhelmed when creating your animated GIF as there are different options to consider. It requires a lot of testing and technical know-how to create complex GIFs. So it is often best to start with simple techniques. Once you’re familiar with the basics of creating GIFs, then you can go ahead to build complex ones.
What is imAIgic?
imAIgic – is a free searchable database of AI-generated images and prompts.
Our team had gathered more than 1000 amazing prompts for all the most popular AI image generation use cases.
At first, images are sourced by our community and editorial team. Then our AI backend scans through the image to create a compelling description and categorize it. We have a long-term vision of creating the largest “learn by example” database of generated images and art.
ImAIgic: Use Cases And Features
1. Easily find the prompt by example image you like
2. Elevate your AI prompt engineering skill by learning how the best prompters are doing it
3. Get a daily overview of the cutting edge features of LLMs, that’s being discovered.